
How to Finish Drywall
It’s easy to engage in a series of hoots, hollers, and high fives once the last piece of drywall has been hung in your renovated room, but you really have to calm down and realize that the job isn’t anywhere near completion.It’s fine to be excited, especially if what you have just finished is your first attempt at hanging drywall, but the reality is that the hardest part is yet to come.
You can’t even begin to think about putting a lick of pain on there until the job is finished, and if you struggled with the hanging, then it might be time to look at hiring a pro. If you still feel comfortable about doing it all yourself, then read on.
Finishing Your Drywall
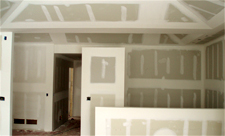 1. If you are still here, then it’s time to get screwed, by which I mean making sure that all the screws used to hang the drywall are set the way they should be. What that means is that all the screws have to be set below the surface of the drywall with no sign of them sticking up. It only takes a couple of screws to be sticking up to make the next step difficult. Checking every screw in the wall may seem like a monotonous chore, but it is absolutely crucial to the proper completion of your project.
Once that is done, you can then commence with your celebrations, that is until you have to start thinking about slapping on some paint.