
How to Repair Holes in Drywall
During my years as a contractor, I got hundreds of calls to repair holes or dents in drywall. Most of these jobs were so small and quick that they fell under my two hour minimum charge and would end up costing the client upwards of $200. Don’t make the mistake of turning to a professional for ever issue; do it yourself.
Minor drywall repairs like a hole or dents don’t require a lot of money or experience and can be done with only a couple hours of work. If you have the right tools and guidance anyone can make quick work of patching drywall holes.
I’m going to show you how to do it for under $30 bucks.
Drywall Tools and Materials
Good news, you won’t need to spend a bunch of money on tools or materials. For a simple drywall repair, it will cost you less than $30 bucks for everything.
Piece of Drywall (1/2” thick) – will act as the patch.
Box cutter – used to square up your hole and to cut drywall.
Wood Support (about 1” thick) – acts as a brace to keep drywall in place.
Putty Knife – used to scoop and apply drywall compound from container.
Measuring Tape – allows you to measure your drywall hole and wood brace.
Sand Paper (medium grade) – used to sand drywall compound after it dries.
Drywall Compound – small container of ready-mixed lightweight drywall compound.
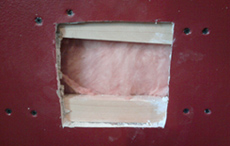
‘Squaring Up’ the Hole

Grab your box cutter and turn the hole into a square (it doesn’t have to be perfect). By cutting a square, it will be easier to place a piece of drywall, rather than cutting a weird shape.
This step is crucial because for a long lasting repair you need a strong area to secure your braces and allow for easy placement of a new piece of drywall. Finally, make sure to cut away any loose paper and clean all broken drywall out of your newly squared surface.
Adding Wood Braces for Support
Cut the braces two to three inches wider than the hole on both sides; this adds a lot of support for the new piece of drywall and will help avoid anymore breaking or crumbling.
After you have the right lengths; add a piece to the top and bottom of your square – giving you plenty of space to countersink screws (make sure to use drywall screws).
* Wooden braces should be 1″ to 2″ inches thick
* Countersink your screws allowing drywall compound to cover easily; resulting in a smooth finish
* Be careful not to sink your screws to close to the edge or it may break the drywall edge
Cutting and Securing Your Drywall patch

Start by measuring the length and width of your square, then take your drywall sheet and map out using your measurements the piece you need to cut out. I would suggest cutting your patch slightly larger than your hole –giving you a tight fit.
Once you have your measurement, take the box cutter and score your lines. You don’t want to rush this process or place to much pressure on the drywall (it may break).
Slowly keep cutting down your lines until the piece if completely free – remember not to rip the paper. Fix your patch piece into place and apply minor pressure while securing the piece with at least 3 threes in the top and bottom. Don’t push too hard because it may break the support or drywall.
* Wipe the surface gently with a damp paper towel to remove any dust.
Applying Drywall Compound
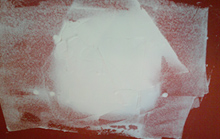
Now that you’ve got the patch secured, take the putty knife and scoop out some drywall compound, slowly apply it to the patched area, while holding your blade at a small angle on the surface of the new patch.
You may need to mix the mud before use.
Applying the mud should be an easy process of doing an “X” pattern back and forward over and around the patched area. Remember to completely fill all screw holes and cracks while apply a thin coverage to the entire surface area around the square.
Now we wait. It needs to sit overnight for it to dry and set properly. You’ll want to come back tomorrow and finish the sanding process.
Sanding the Drywall Repair
Sanding is our final step. Luck for us, we have a couple options for sanding methods when doing small or medium drywall repairs – wet sand drywall or sanding paper.
Wet Sand Drywall, Dust Free Method *Preferred
Wet sanding drywall requires little experience, clean-up or time. I always use this method on small to medium drywall repairs; especially when a client has carpet or furniture in the same room as my work area. No mess, no fuss – wet sanding drywall.
Using Sand Paper
While using a medium grade sand paper, begin sanding in a circular motion while applying even pressure across the entire surface. Being consistent with pressure and motion will result in a clean and smooth finish.
Don’t want to over-sand the area causing dents or breaks – that will cost you another day while you wait for the second mudding to dry. You’ll know that you’re done standing with you take your hand and can feel that the surface is smooth and no longer rough or bumpy.
You should eventually get a nice, smooth surface that’s ready for primer and paint.